


Estimated reading time: 9 minutes
Live streaming on a personal website is possible with the right tools and a simple setup. This guide explains how to stream from OBS to your own website using WordPress and the WpStream plugin. Instead of using platforms like YouTube or Twitch, a streamer can host live video directly on their own site. Each step is described in simple terms, from preparing the website to going live with OBS Studio.
By streaming on an independent site, the content creator has complete control over the viewer experience. There are no third-party ads or suggested videos to distract the audience. The live stream plays on the creator’s own webpage, keeping visitors engaged on that site rather than sending them elsewhere.
You can check out this video where we show you exactly how to livestream to your website with OBS Studio.

By the end of this article, a site owner will be able to set up a live stream on their WordPress site with confidence. All the required steps and important tips are included, presented in a way that a beginner can follow easily.
What Is OBS Studio?

OBS Studio is a free program for live video streaming. It works on Windows, Mac, and Linux computers. The software lets a streamer capture video and audio from multiple sources and combine them into a single live broadcast.
OBS Studio allows streaming to any platform or server as long as the correct details are provided. This means it can be configured to send a live feed directly to a personal website, not just to major streaming sites.

To start using OBS Studio, download and install it from the official OBS Studio website. Once installed, the streamer can set up OBS with any video sources (such as a camera or a screen capture) and audio sources (such as a microphone) they plan to broadcast.
Why Stream on Your Own Website?
Streaming on one’s own website has several advantages over using external platforms. The streamer has complete control over the content and presentation. On a personal site, there are no forced ads or unrelated videos surrounding the stream. Viewers focus solely on the intended content, free from the distractions common on YouTube and other free platforms.
Branding and customization are other benefits. The site owner can design the streaming page with their own logo, colors, and layout. There are no platform watermarks when streaming on a self-hosted site. This gives the broadcast a professional appearance and reinforces the creator’s brand identity.

Monetization is also more flexible on a personal website. When a streamer hosts the video on their own site, they can choose how to monetize it. For example, they could display their own ads, charge for access, or offer paid subscriptions through a plugin. They are not limited by the strict rules or revenue splits of third-party services, so the creator keeps a larger share of any earnings from the live stream.
Setting Up a WordPress Site for Live Streaming
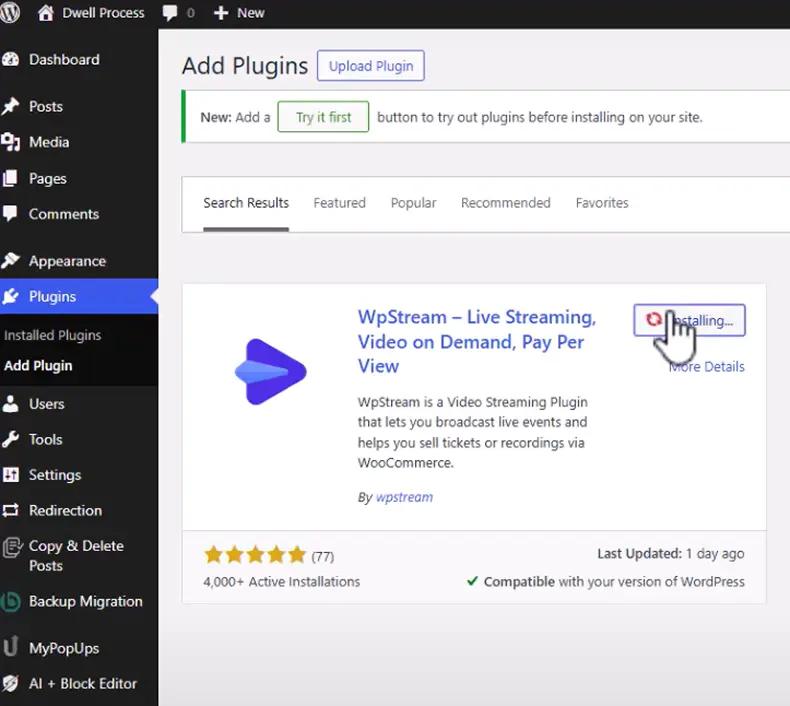
For streaming on a WordPress site, the main requirement is the WpStream plugin. WpStream is a live streaming tool that quickly turns a regular website into a video streaming platform.
Install and activate the WpStream plugin on the WordPress site. Then, create a free WpStream account on the official website if they don’t have one. In the WordPress dashboard, open the WpStream plugin settings (under “Credentials”) and log in with the new account. This links the website to WpStream’s streaming service.

Next, add a new live channel in the WpStream section of the WordPress dashboard. Give the channel a title and description. For a public broadcast, select a free (open) channel type. Publish the channel, then toggle it ON to make it live and ready to receive a stream.
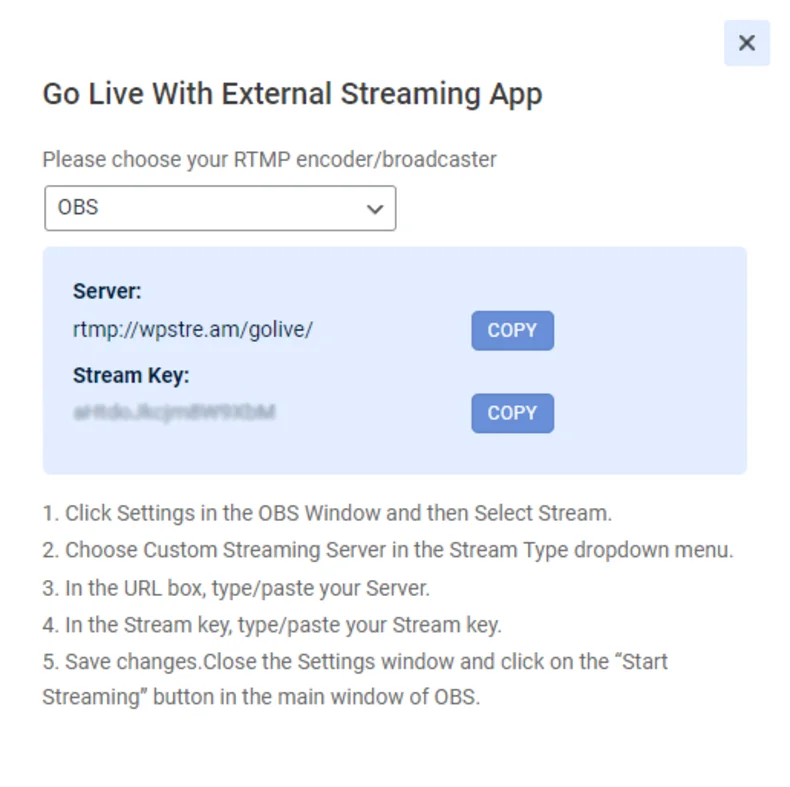
Once the channel is active, WpStream provides a Server URL and a Stream Key for that channel. These details are what OBS Studio will use to send the stream. Copy the stream key and note the server URL. The stream key is like a password that allows broadcasting to the channel and should be kept private.

Testing Your Internet Connection
Live streaming requires a stable internet connection with enough upload speed. It’s a good idea to test the network using Speedtest.net before going live. If the upload speed is too low, the video might lag or buffer for viewers. As a rule of thumb, streaming in HD 720p usually works well with an upload speed of at least 3–5 Mbps (megabits per second). Higher-quality 1080p streams may require 5–10 Mbps or more. Having sufficient bandwidth helps ensure a smooth, clear video feed.
For better stability, use a wired Ethernet connection instead of Wi-Fi when possible. A wired connection is more reliable and reduces the chance of dropouts or interference during the live broadcast. This way, the stream is less likely to freeze or disconnect due to network issues.
Finally, consider running a short test stream before the real broadcast. A quick trial run lets the streamer check that the video and audio are working correctly. It is much easier to fix any issues during a test than when live with viewers. By testing ahead of time, the site owner can go into the actual stream knowing everything is set up correctly.
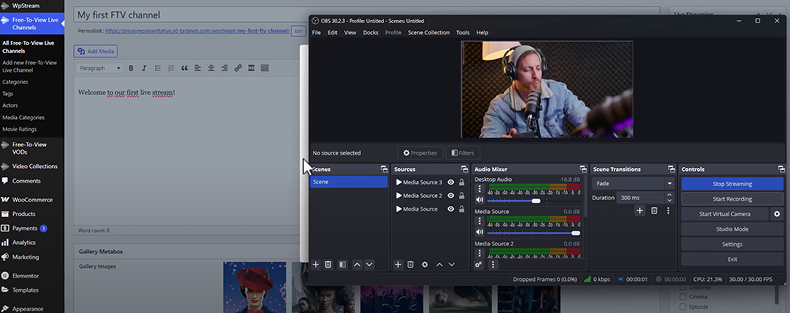
Configuring OBS Studio for Your Website
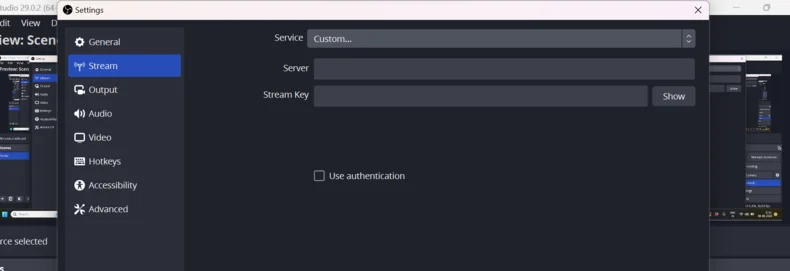
In OBS Studio, open Settings and go to the Stream section. This is where the streaming server configuration is set.
If WpStream appears as a service option in OBS, select it. Then paste the WpStream stream key into OBS when prompted. OBS will automatically use the correct server settings for WpStream once the key is entered.
If WpStream is not listed, choose Custom Streaming Server. Then paste the Server URL from WpStream into the OBS server field, and paste the Stream Key into the key field.
Double-check that the server and key are entered correctly, then apply the settings. For example, the server URL will look like your typical ‘golive’ URL and the stream key will be a unique code for the channel. Please make sure the stream key is correct and keep it private, since it allows access to broadcast on that channel. This is especially true is you enable the ‘Auto Turn On’ setting on WpStream

Starting the Live Stream
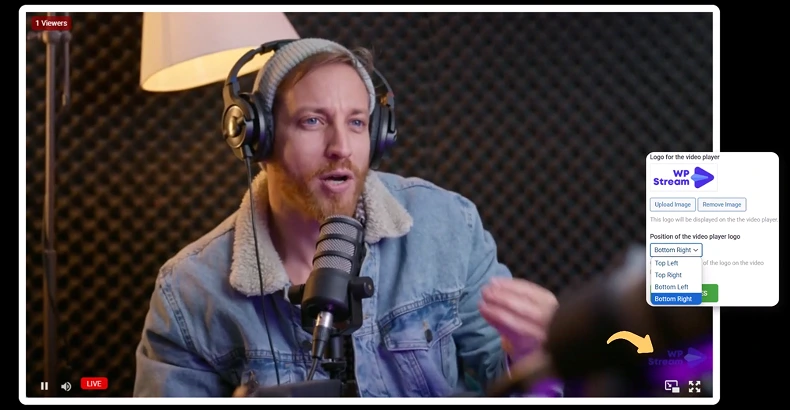
At this point, streaming from OBS to your own website comes down to starting the broadcast and watching it on your site. Before clicking “Start Streaming” in OBS, ensure that the channel on the WordPress site is turned ON and waiting for the stream. (On the site’s channel page, it may say “Offline” until the feed begins.)
Now, in OBS Studio, click the Start Streaming button. OBS will connect to the WpStream server and begin sending video data. After a few seconds, the live video feed should appear on the website’s channel page. Viewers who visit that page will see the stream playing in real time (with only a short delay).

When the session is over, the streamer can end the stream by clicking Stop Streaming in OBS. This stops the broadcast, and the video player on the website will go offline or show that the live stream has ended. It is a good idea to also turn the channel off in the WordPress dashboard after finishing. The same channel can be turned on again for a future stream, and the process can be repeated when needed.
Tips for a Smooth Streaming Experience
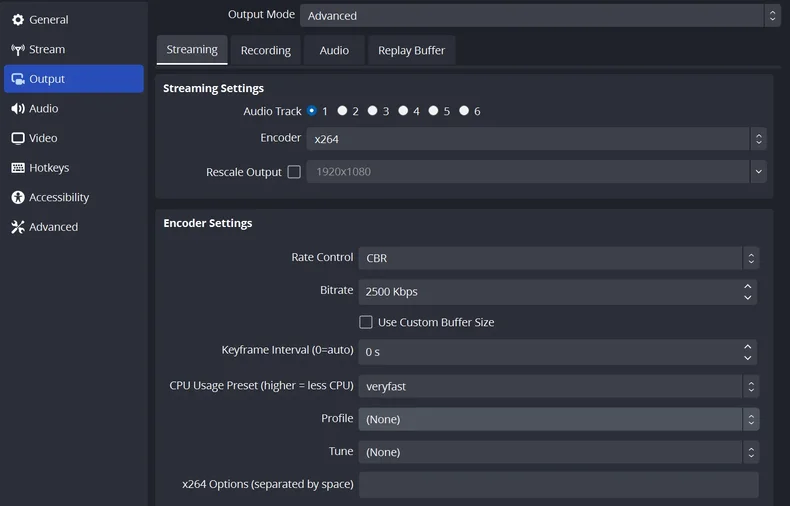
- Optimize OBS Settings: Adjust the video resolution and bitrate in OBS Studio to match the internet connection and the computer’s capabilities. For example, if the connection is limited, streaming at 720p with a lower bitrate (e.g., 2500 kbps) can help reduce lag. Finding the right balance will ensure a clear stream without interruptions.
- Ensure Good Audio Quality: Clear audio is just as important as video. Use a reliable microphone and test the sound before going live. Make sure the volume levels in OBS are not too low or too high. Viewers are more likely to continue watching if they can hear the speaker or music clearly.
- Prepare Your Equipment: Set up all the gear (camera, lighting, microphone) well in advance. Good lighting and a steady camera will make the live stream look professional—also, close unnecessary programs on the computer to give OBS more resources, helping it run smoothly.
- Engage with Viewers: If the website has a chat feature or comment section, try to interact with the audience during the live stream. Welcoming viewers or answering questions can make the experience more interactive and fun. Engaged viewers are more likely to return for future streams.
- Be Consistent: If live streaming becomes a regular activity, maintain a schedule by going live at the same time on certain days. A consistent schedule helps build an audience over time, as people know when to visit the site to watch the stream.

Streaming from OBS gives the creator independence and control. With WordPress and the WpStream plugin, this setup is accessible even to newcomers. By following the steps above and practicing these tips, any content creator can broadcast confidently on their own site. If you want to learn how to embed a YouTube live stream on your WordPress site, check out this guide.
WpStream also offers a free trial plan, allowing new users to test streaming on their website. In this way, learning to live stream with OBS on a personal site is achievable for anyone, with professional-looking results.