The digital revolution has seen the rise of a new form of storytelling, where content creators, gamers, and professionals employ live streams to instantly connect with their audience.
With the rise of platforms like Twitch, YouTube, and Facebook Live, streaming has become not just an engagement tool but an avenue for making compelling content, building communities, and even making a living.
At the core of this live streaming phenomenon is Open Broadcaster Software (OBS), a veritable magic wand in the hands of the streamers, helping you manage every aspect of your streaming setup – including video and audio quality, stream stability, and elements of your on-screen aesthetics.
Whether you’re a veteran streamer orchestrating a grand spectacle for thousands of viewers or an enthusiastic beginner just dipping your toes into the live streaming waters, mastering OBS settings is your key to a seamless and high-quality streaming experience.
However, with the seemingly endless array of options and settings in OBS, you might feel like you’re trying to navigate an intricate maze with no clear map at hand.
Fortunately, you can take this guide as your compass, offering valuable tips, tricks, and best practices to ensure you can deliver a stream that’s as captivating and glitch-free as a professionally produced TV show.
Get ready to explore how to fine-tune OBS for optimal performance, achieve the best video and audio quality, and troubleshoot common issues that might spring up during your live streaming adventures.
After all, knowledge is power, and with power comes the potential for truly epic streams!
Introduction to streaming with OBS
Open Broadcaster Software (OBS) stands as a testament to the transformative power of technology in the realm of real-time content creation. It is an essential tool for modern-day streamers, allowing them to craft compelling content and showcase their creativity to audiences worldwide.
At its heart, OBS is a free and open-source software specifically designed for recording and live streaming. Whether you want to capture the thrill of an epic gaming moment, share knowledge in an educational webinar, or connect with your followers in a live vlog, OBS can help you make it happen.
Imagine the possibilities: you can record and broadcast everything happening on your computer screen, switch between multiple camera angles, layer in external audio sources, integrate screen recordings, and even add custom overlays and transitions to make your stream uniquely yours!
This is the power that OBS places at your fingertips, and it’s why this software has become a favorite among content creators, gamers, and professionals alike.
OBS’s functionality isn’t restricted by the device you’re using or the platform you wish to stream on. It’s a friendly companion to Windows, macOS, and Linux users alike.
In terms of compatibility, OBS plays nicely with popular streaming platforms such as Twitch, YouTube, Facebook Live, and professional streaming solutions like WpStream. So, whether you plan to broadcast on a third-party platform or your own website, OBS is ready to light up the stage for your streaming performance.
Before you dive headfirst into the streaming waters with OBS, however, there are some critical considerations you need to address:
1. How strong is your internet upload speed?
For a generally smooth streaming experience at 720p resolution, you’ll want to have an upload speed of around 5 Mbps. However, the higher your upload speed, the better your streaming experience will be.
2. Is your computer equipped for the streaming journey?
A modern CPU and high-quality graphics card are essential tools for handling OBS’s demands, to ensure smooth sailing during your streaming sessions. Moreover, you’ll ideally want your computer to have at least 8 GB of RAM, providing enough space to handle all the tasks OBS may need to perform.
3. Where are you planning to broadcast your stream?
OBS is a versatile tool compatible with both popular free and professional streaming platforms. However, the optimal OBS settings will vary from platform to platform. If you’re unsure about which streaming platform suits your needs best, be sure to check out our comprehensive guide on the best streaming services.
Once you have answers ready to all of these questions, it’s time to embark upon the path to understanding OBS settings and how you can adjust them.
How do I adjust my OBS settings?
When you first launch OBS, you’ll be greeted by the auto-configuration wizard, an intuitive tool that matches the OBS settings to your computer’s specs.
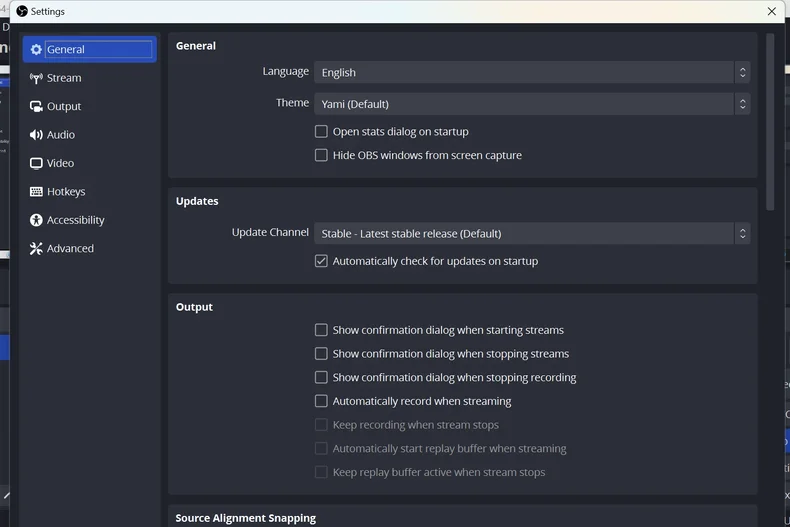
To adjust your OBS settings manually, navigate to the Settings menu. You can do this by clicking File > Settings on the OBS interface. Here, you’ll find an array of categories, each containing its own set of settings you can tweak to your liking:
- General: These are the settings that form the backdrop of your OBS experience, without directly affecting your stream or recording quality. Here you can personalize OBS to your liking by changing the platform language or switching between different themes.
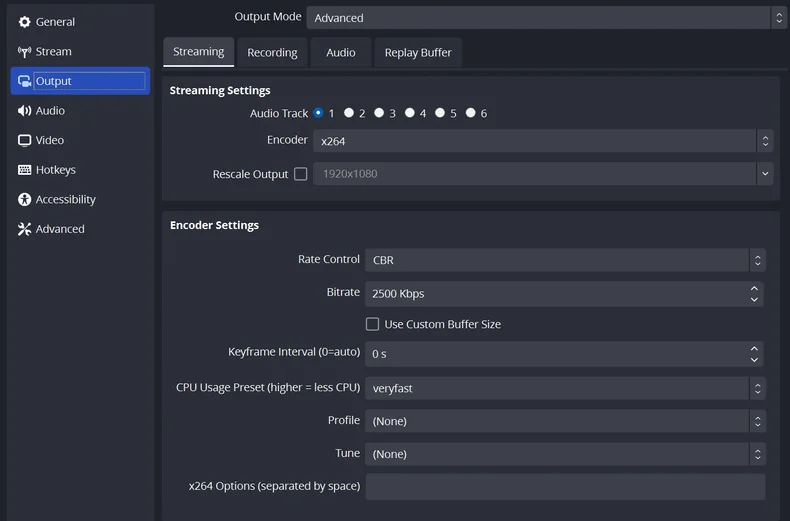
- Output: In the Output tab, you can customize the format and encoding settings for your recorded videos and live streams. You can set the video and audio bitrate, choose your preferred encoder, and select the recording format before you start streaming.
- Video: This is where you can set your base (canvas) resolution, which ideally should match the size of your monitor to capture the full screen. You can also set the downscale filter and frame rate to ensure your stream flows smoothly.

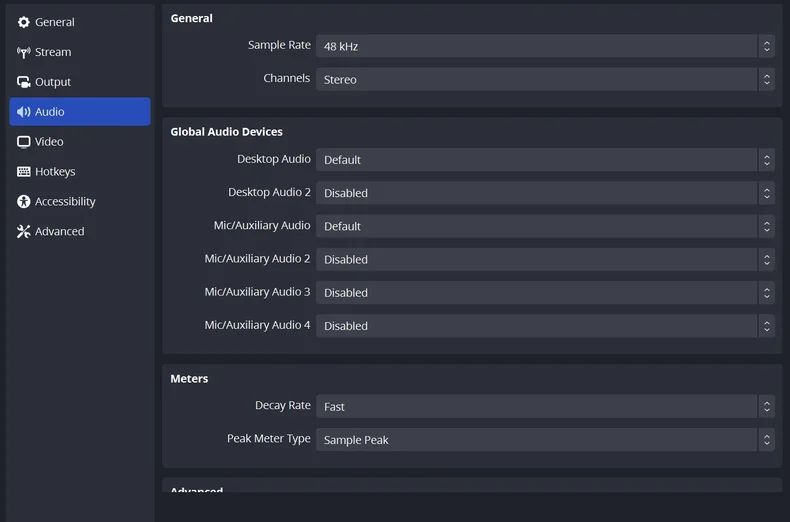
- Audio: Here, you can fine-tune the sonic dimension of your stream. You can set the sample rate (a higher sample rate equals clearer sound), configure the audio channels, and manage any audio devices you have connected.
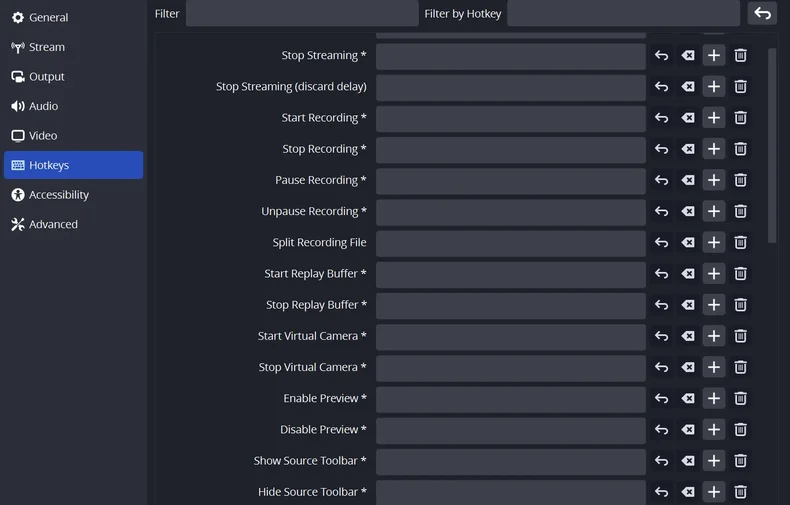
- Hotkeys: With these settings, you can set up custom hotkeys for easy configuration on the fly, enabling you to swiftly make changes during your live stream without navigating through menus. This makes providing a seamless viewing experience for your stream audience a breeze.
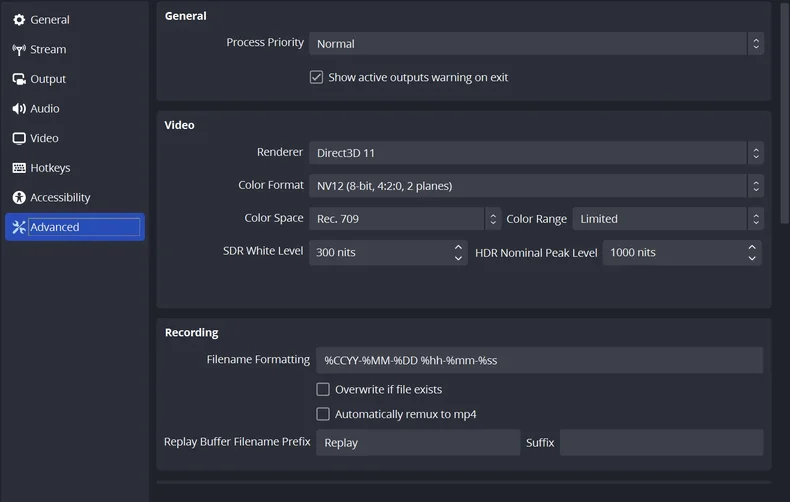
- Advanced: For those desiring more precise control over their streaming video, the Advanced settings serve as the control panel for specific adjustments, like color settings and processing priority.
For what it’s worth, it’s always good to spend some time exploring and adjusting your OBS settings before going live. By doing so, you’ll ensure your stream runs smoothly, looks great, and sounds clear – paving the way for an enjoyable viewing experience for your audience and a successful streaming journey for you.
What are the best OBS settings for streamers?
The path to creating an exceptional streaming experience involves intricate calibration of OBS settings. The ‘optimal settings’ can be nebulous, influenced by your computer’s hardware, internet connection speed, and the specific requirements of your stream.
Although there is no one-size-fits-all configuration, there are general guidelines that can offer a solid starting point.
Let’s delve into these crucial settings to help you better understand how each one contributes to enhancing your stream.
Video settings

- Base (canvas) resolution: This should correspond to your monitor’s native resolution or the desired output resolution. For instance, if your monitor resolution is 1920×1080, this is the resolution you should set for your OBS base.
- Output (scaled) resolution: This depends on the streaming platform’s requirements and your internet upload speed. Typically, 720p (1280×720) is a good starting point, but if your internet connection allows, 1080p (1920×1080) can provide a superior viewer experience.
- Downscale filter: This setting is used when your output resolution is lower than your base resolution. Bicubic or Lanczos (Sharpened scaling, 32 samples) usually yield the best results by providing a balance between quality and resource usage.
- FPS (frames per second): The optimal frame rate hinges on your content type and the streaming platform. For most content, 30FPS is sufficient. However, if you’re streaming high-motion content, such as video games, 60FPS will provide a smoother, more fluid visual experience.
Video bitrate
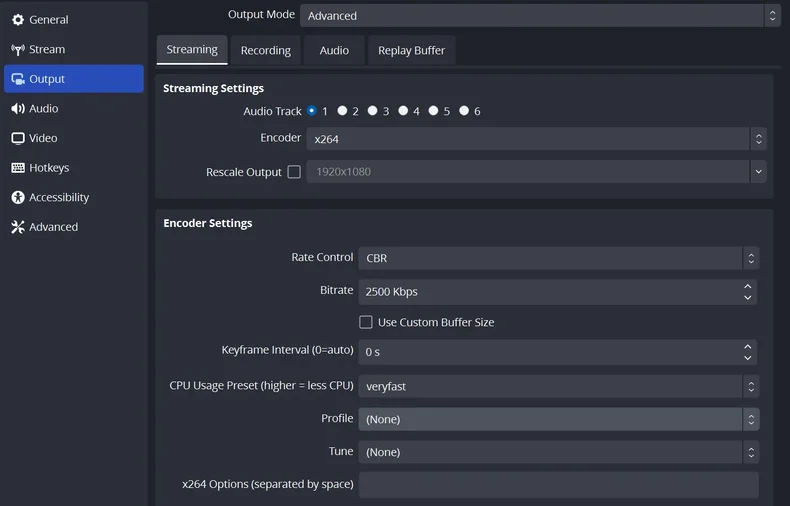
Bitrate refers to the amount of data processed per second in kilobits (kbps). This setting depends on your available upload speed and the platform’s bitrate limit. Higher bitrates result in better stream quality but demand a faster internet connection.
For example, Twitch recommends a bitrate between 3000-6000 kbps for 720p, and 6000-8000 kbps for 1080p.
You can manage the bitrate and encoder streaming settings from the Output settings tab.
Encoder
- Software (x264): This encoder uses your CPU to process the video and is OBS’s default option. It’s renowned for its consistent quality and is a good fit for most streaming setups.
- Hardware (NVENC, AMD VCE): Hardware encoders use your GPU to process video, offloading the work from the CPU. This can improve performance and reduce CPU usage, especially beneficial for resource-intensive tasks like gaming. However, the quality may slightly lag compared to software encoding, especially at lower bitrates.
Audio settings
- Sample rate: This can be set to 44.1 kHz or 48 kHz, based on your audio equipment and streaming platform requirements.
- Bitrate: Bitrates between 128-160 kbps are generally adequate for most audio setups in a streaming context. For streams where audio quality is paramount, you might want to push this up to 320 kbps. This setting can be modified from the Output > Audio tab.
- Channels: Stereo (2 channels) is standard for most streams. However, this should be tailored to fit your specific audio setup.
Advanced settings
- Keyframe interval: A setting of 2 seconds is usually recommended. This can help with reducing buffering and improving playback on the viewer’s end.
- CPU usage preset: For software encoding, this balances CPU usage and encoding quality. “Veryfast” is a reliable starting point. You can tweak it further based on your CPU’s processing power and your stream’s performance.
Here’s a bird’s-eye view of some popular streaming platforms and their recommended audio-video settings in OBS:
| Platform | Video Resolution | Video Bitrate (Recommended Range) | Keyframe Interval (seconds) | Encoder | Audio Bitrate | Audio Sample Rate |
| Twitch | 720p (1280×720) or 1080p (1920×1080) | 3000-6000 kbps (720p), 4500-8000 kbps (1080p) | 2 | x264 (Software) | 128-160 kbps | 44.1 kHz or 48 kHz |
| YouTube Live | 720p (1280×720) or 1080p (1920×1080) | 4500-9000 kbps (720p), 9000-18000 kbps (1080p) | 2 | x264 (Software) | 128-160 kbps | 44.1 kHz or 48 kHz |
| Facebook Live | 720p (1280×720) | 2000-4000 kbps | 2 | x264 (Software) | 128-160 kbps | 44.1 kHz or 48 kHz |
| WpStream | 720p (1280×720) or 1080p (1920×1080) | 2500-5000 kbps (720p), 5000-10000 kbps (1080p) | 2 | x264 (Software) | 128-160 kbps | 44.1 kHz or 48 kHz |
Remember, these guidelines serve as a solid starting point, but should be customized and fine-tuned based on your unique setup and requirements. We recommend frequent testing and monitoring to ensure optimal performance and an unparalleled streaming experience.
How do OBS settings for recording differ?
Although OBS is frequently associated with live streaming, it’s also an incredibly robust tool for video recording.
The key difference between streaming and recording settings in OBS stems from the fact that recording doesn’t face the same constraints. Unlike streaming, which is influenced by upload speed and streaming platform restrictions, recording can take advantage of your system’s full potential to create high-quality content.
Here’s how to make the most of your OBS settings for recording:
Video settings
- Bitrate: In a recording setting, bitrate plays a critical role in determining the visual quality of your video. Since the limiting factor of upload speed does not come into play when recording, you can comfortably set a higher bitrate. This increases the video data recorded per second, ultimately leading to better video quality.
- Output resolution: While streaming, it’s common to downscale resolution to balance quality and bandwidth. For recording, you can elevate this to capture content at a higher resolution. This is particularly useful if you want to maintain a superior level of detail in your recorded videos, such as 4K or 1080p.
Encoder
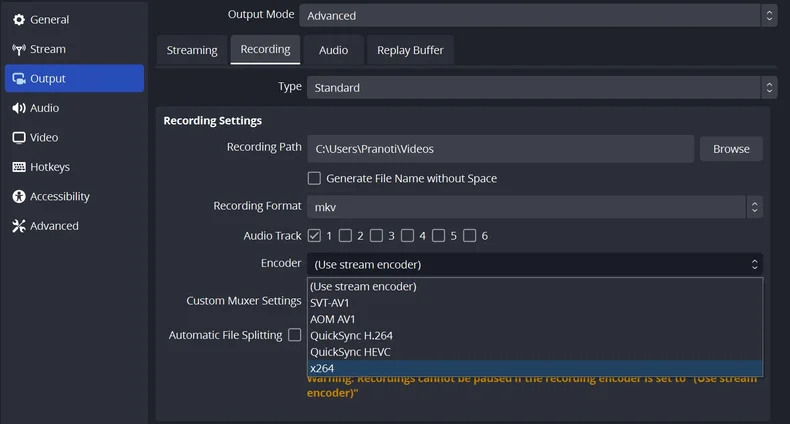
Software (x264) vs. hardware (NVENC, AMD VCE, Intel Quick Sync): As with streaming, the choice between software and hardware encoding during recording depends on your setup and the performance of your PC.
If your GPU can handle the additional load, hardware encoding can lead to more efficient recording, particularly for high-resolution content.
Audio settings
Recording gives you the flexibility to record higher-quality audio compared to streaming. This not only results in better audio in the recordings but also offers more flexibility during post-production editing.
- Sample rate: The sample rate determines the number of samples of audio carried per second. OBS allows you to set a sample rate of either 44.1 kHz or 48 kHz. For most applications, 44.1 kHz is sufficient. However, if your audio equipment supports it and you want the best possible audio quality, you can set this to 48 kHz.
- Bit depth: The bit depth refers to the number of bits of information in each sample, and it directly corresponds to the resolution of each sample. OBS supports 16 bit and 24 bit, with 24 bit providing a wider dynamic range.
- Audio tracks: OBS gives you the option to separate your audio sources into different tracks, which can be highly beneficial during post-production. For example, you could have your microphone audio on one track and your system audio on another. This allows you to independently adjust the volume levels or apply effects to each track in your video editing software.
Having said that, the best configuration always depends on your specific hardware and content requirements. Experiment, iterate, and find the perfect setup for your recording needs. With the right settings in place, OBS can be an incredibly powerful tool for content creation beyond live streaming!
Troubleshooting common OBS issues
While OBS is a powerful tool, users may occasionally encounter issues during their streaming or recording sessions. In this section, we’ll cover some common problems and provide solutions to get you back on track as swiftly as possible.
Dropped frames
Dropped frames can significantly disrupt the quality of your stream, creating a choppy experience for your viewers. Here are some ways to troubleshoot this issue:
- Check your internet connection: A stable and robust upload speed is vital for streaming. If you’re experiencing issues, consider testing your internet connection. If possible, using a wired connection can often provide a more reliable result than Wi-Fi.
- Adjust bitrate: If you’re seeing dropped frames despite having a reliable internet connection, it might be worth lowering the bitrate in your OBS settings. This reduces the amount of data being transmitted, which can alleviate the issue.
- Close unnecessary applications: If your computer is running several resource-intensive applications simultaneously, it might struggle to keep up. Closing any unnecessary programs can free up system resources, potentially reducing dropped frames.
Audio sync problems
Issues with audio syncing can lead to an unprofessional stream. Here’s how to solve them:
- Adjust audio sync offset: If your audio is out of sync with your video, you can use OBS’s ‘Audio Sync Offset’ option to manually align them.
- Check sample rate settings: Ensuring the sample rate of OBS matches your audio source’s sample rate is crucial. If these don’t match, it can lead to sync issues.
- Use an external audio mixer: If syncing issues persist, consider using an external mixer or virtual audio cable software to handle your audio sources separately.
Display capture issues
Sometimes, OBS may have difficulty capturing your display. Here are some solutions:
- Run OBS as an administrator: Right-click on the OBS shortcut and select “Run as Administrator.” This can resolve display capture issues caused by restricted permissions.
- Disable hardware acceleration: Some applications may interfere with OBS’s ability to capture your display. Try disabling hardware acceleration in these applications.
- Use window capture or game capture: If you’re still experiencing issues, try using the window capture or game capture options. They can capture specific windows or games directly, bypassing any display capture problems.
General troubleshooting tips
- Update OBS and drivers: Always ensure that you have the latest version of OBS and that your graphics card drivers are up-to-date.
- Restart your computer: Often, a simple system restart can resolve temporary issues or conflicts.
- Check hardware limitations: Your hardware should meet the minimum requirements for streaming or recording. If it doesn’t, you may experience performance issues.
- Test different settings: If you’re experiencing issues, don’t be afraid to experiment with different settings in OBS. Adjusting the bitrate, encoder, or resolution might help you find the perfect setup.
Golden rules for OBS streaming
Using OBS with a WordPress streaming plugin like WpStream? Here are some pointers to remember to ensure a smooth streaming experience:
- Your CPU usage should always be below 80%.
- Avoid running CPU-intensive applications while streaming.
- The display FPS should match the number you’ve set in the settings.
- The “Encoding Overloaded!” message should never appear.
- The status indicator light should always be green.
OBS is a versatile tool, and with these troubleshooting tips, you can confidently resolve any issues that may arise during your streaming or recording sessions. Happy streaming!
Take your streams to the next level with OBS and WpStream
Optimizing your OBS settings is more than just a technical requirement – it’s an art form that, when mastered, allows you to deliver a seamless and immersive streaming experience.
For those of you planning to broadcast directly on your own websites, consider integrating OBS with WpStream. This powerful combination unlocks a host of benefits, providing you with an unprecedented level of control over your streaming experience.
WpStream, as a white-label streaming platform, puts you in the driver’s seat, allowing you total control over your stream content and appearance.
It offers powerful extensions, such as multistreaming support and eCommerce integration, that can be invaluable for enhancing your audience’s experience and monetizing your content.
Moreover, WpStream’s robust security features mean you can stream with peace of mind, knowing your content is private and secure. These are just a few of the many advantages that OBS and WpStream bring to your streaming journey.
Unlock your streaming potential by exploring WpStream’s full feature set or by trying it out with a free trial. The world of live streaming awaits you, and with OBS and WpStream, you have all the tools you need to succeed.
So why wait? Start your streaming journey today and enhance your streaming experience to captivate your audience!
Table of Content
