OBS(Open Broadcaster Software) is free and open source software for video recording and live streaming. You can use either your PC’s embedded camera or externally connected camera as a video source with OBS. Sound sources also can be configured.
Let’s have a look at step by step how to use OBS for streaming:
1. Install OBS
Download OBS Studio from obsproject.com and Install it. You can download it on Windows, Mac and Linux.
2. Add Sources
When you open OBS, it starts to capture from your built-in camera if it exists by default. You can add or remove video/audio sources from the ‘Sources’ section. OBS is an easy to use and pro tool that has many features. Find out more information about streaming with OBS here.
3. Configure OBS
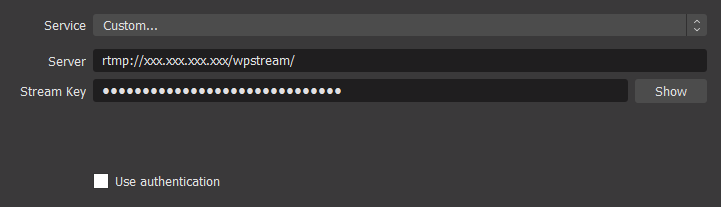
- Click Settings in the OBS Window and then Select Stream.
- Choose Custom Streaming Server in the Stream Type dropdown menu.
- In the URL box, type/paste your Server
- In the Stream key, type/paste your Stream key
- Save changes
4. Start Streaming
Close the Settings window and click on the “Start Streaming” button in the main window of OBS.
vMix allows users to switch inputs, mix audio, record outputs, and live stream cameras, videos files, audio, and more, in resolutions of up to 4K.
1. Install vMix
Download vMix from https://www.vmix.com/ and Install it. You can get in on Windows, Mac and Linux.
2. Provide Sources
Click to the add input button and add some input for the broadcast. You can either add your camera or choose a media file.
3. Configure vMix
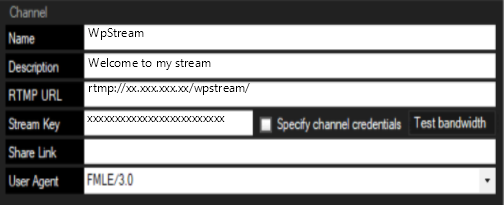
- Click on the gear icon near the stream button on the bottom
- Choose a custom RTMP Server in destination.
- In the URL box, type/paste your Server
- In the Stream key, type/paste your Stream key
- Save changes

4. Start Streaming
After configuring your settings and adding the server address from WpStream, you can start streaming by clicking on the stream button at the bottom of the dashboard.
Wirecast is a paid live video streaming production tool by Telestream. It allows users to create live or on-demand broadcasts for the web.
1. Install Wirecast
Download Wirecast from https://www.telestream.net/wirecast/ and Install it. You can download it on Windows, Mac and Linux.
2. Provide Sources
Open Wirecast click the + button as in the screenshot and you can either use your camera to broadcast or pick a media file.
3. Configure Wirecast
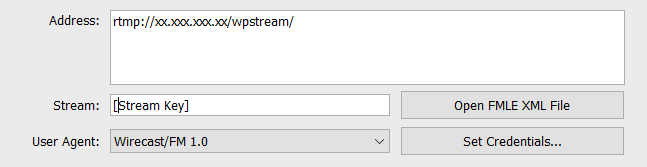
- Click Output on the top of the screen and then Select Output Settings
- In the destination, choose RTMP Server and click OK.
- In the Address box, type/paste your Server.
- In the Stream box, type/paste your Stream key
- Save changes
4. Start Streaming
Click on OK to save changes just click the Output on the top of the screen and then Start/Stop Broadcasting.
XSplit is a free and open source software used for live streaming and video recording. It is easy to use and provides a great canvas for pc gaming, talk shows, presentations, and many more purposes. Embedded or external camera and audio sources can be used with XSplit.
1. Install XSplit
Download Open Broadcaster Software from xsplit.com and Install it.
2. Provide Sources
When you open the XSplit, it will ask for the canvas option for different purposes. It is easy to adjust with drag and drop. It has some useful features for streaming.
3. Configure XSplit
We’re assuming that your Ant Media Server accepts all streams. (There is no any security option enabled.)
- Click Broadcast in the XSplit Window and then click ‘Set up a new output’
- Choose Custom RTMP in the Set up a new output dropdown menu.
- You can write any name and description you want.
- In the URL box, type/paste your Server
- In the Stream key, type/paste your Stream key
- Save changes
4. Start Streaming
Close the Settings window and click on the “Stream” button in the main window of XSplit. It will start streaming.
Larix Broadcaster is a free app for iOS and Android that you can use to live stream from your mobile device. It requires 3 things:
- A mobile phone or table
- Larix Broadcaster Mobile App
- WpStream account
1. Install Larix Broadcaster
Download from Google Play or the App Store. Once you open up the app, it will ask permission to use your camera, microphone, and location. All of these should be allowed.
2. Provide Sources
Your camera is ready.
3. Configure Larix Broadcaster
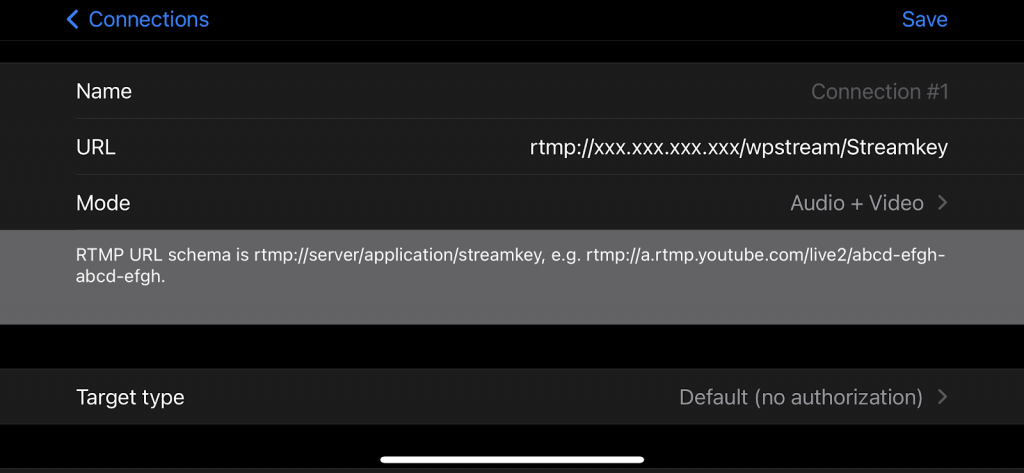
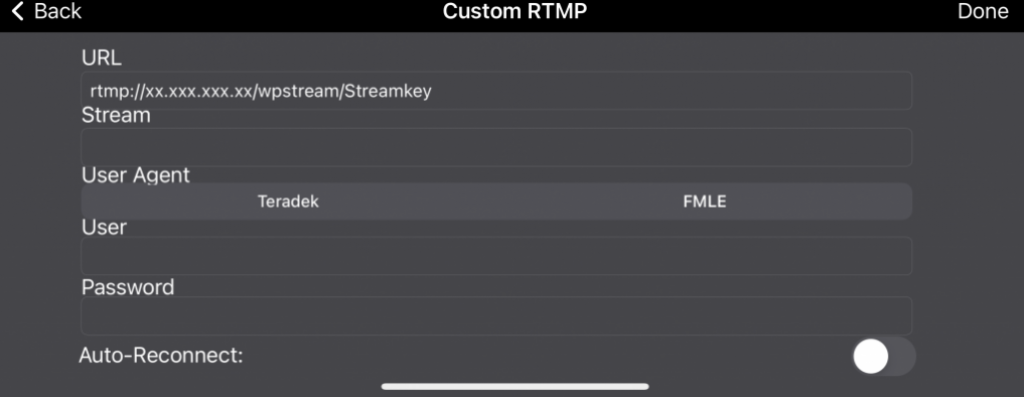
- Click Settings and then click ‘Connections’, and ‘+’
- Give it a name
- Choose Custom RTMP in the Set up a new output dropdown menu.
- In the URL box, type/paste your Server and Stream Key one after the other
- Save
4. Start Streaming
Go back and click on Record. It will start streaming.
nanoStream is a free app for iOS and Android that you can use to live stream from your mobile device. It requires 3 things:
- A mobile phone or table
- nanoStream app
- WpStream account
1. Install nanoStream
Download from Google Play or the App Store. Once you open up the app, it will ask permission to use your camera, microphone, and location. All of these should be allowed.
2. Provide Sources
Your camera is ready.
3. Configure nanoStream
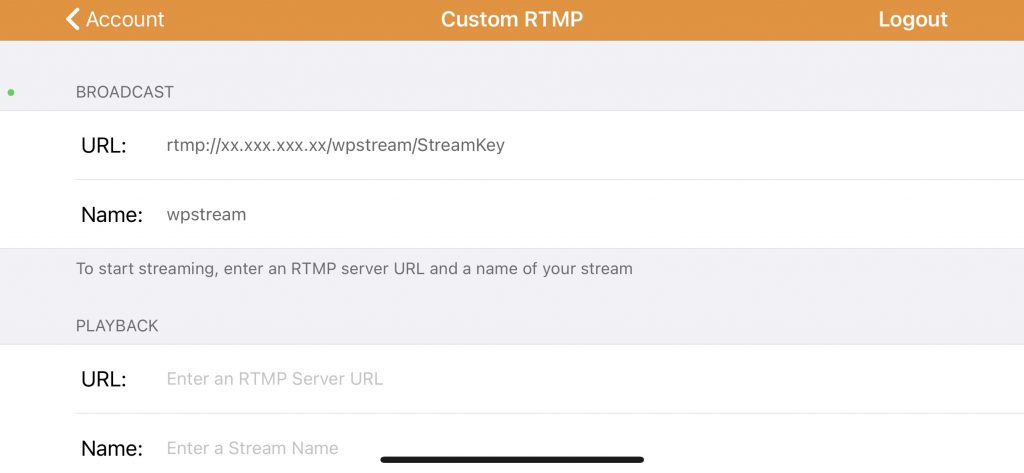
- Click Settings and then click ‘nanoStream Cloud Public’, and ‘Custom RTMP’
- Under ‘Broadcast’, in the URL box, type/paste your Server and Stream Key from WpStream one after the other
- Give it a name
- Login
4. Start Streaming
Go back to the start screen and click on Record. It will start streaming.
BroadcastMe – is an iOS application which allows you to stream from your mobile phone. It requires 3 things:
- A mobile phone or table
- BroadcastMe app
- WpStream account
1. Install BroadcastMe
Download from Google Play or the App Store. Once you open up the app, it will ask permission to use your camera, microphone, and location. All of these should be allowed.
2. Provide Sources
Your camera is ready.
3. Configure BroadcastMe
- Click Settings and then click ‘Server URL’
- Type/paste your Server and Stream Key from WpStream one after the other
- Click on ‘Add’
- ‘Done’
4. Start Streaming
Go back to the start screen and click on Record. It will start streaming.
Restream allows you to multi stream to several platforms at the same time. Besides multi streaming, you can also schedule, have a chat, and observe analytics.
1. Go to Restream.io and purchase a Standard Plan
In order for custom RTMP to work, you will need to purchase a plan. Next, go to your admin and set up a destination or channel. Choose ‘Custom RTMP’ and add the Server and Stream Key from WpStream. ‘Add Channel’

2. Add other channels (if you want to multistream)
Click on ‘Add Channel’ again and choose the social platforms you wish to broadcast on.
3. Go Live!
- Enter Live Studio
- Adjust all your preferred settings
- Click on ‘Go Live’
StreamYard is a live streaming studio in your browser where you can interview guests and stream to multiple platforms at the same time, including YouTube, Facebook, and Twitch. However, if you wish to broadcast directly to your website, you will need WpStream for WordPress.
1. Go to Streamyard.com and purchase a Basic Plan
In order for custom RTMP to work, you will need to purchase a plan. Next, set up your destination. Go to your admin. Choose ‘Custom RTMP’ and add the Server and Stream Key from WpStream. ‘Add RTMP server’

2. Start a broadcast
Go to ‘Broadcasts’ and create a broadcast. Add a title and ‘Create broadcast’
3. Go Live!
- Enter Live Studio
- Adjust all your preferred settings
- Click on ‘Go Live’