Updated February 9th, 2026
Setting up a live stream with Melon & WpStream
The first thing you will need to do is look up WpStream in the ‘Plugins’ section of your WordPress Admin. Install and activate the plugin as you can see in our documentation. You will also find out how you can log into your account or register a new one. Next, connect to WpStream by adding your username and password.
The second step is setting up Melon App. Melon App is a streaming app that you can use to customize your live stream and also stream to multiple platforms including your WordPress website, Facebook, YouTube, Twitter, etc.

Purchase a plan
Note that in order to be able to broadcast on your website, you will need purchase one of the Plans on Melon. This is because the ability to add a custom RTMP (destination to website) is only available on their paid plans.
If you check out their plans, you will find a few convenient ones for personal use or for business. You can also purchase monthly or yearly plans. For this tutorial, we purchased the monthly $15 standard plan.
As you can see, there is a free plan that has a few features that can be used, however, these features are often not enough for professional streaming.
If you go for a yearly ‘Standard’ plan, you will spending $12.50 per month and be able to brand your live stream, have unlimited streaming, multi stream to 3 platforms, custom streaming, and many more advantages.
Make sure you register/sign in by adding your email. You will then be sent a code to your email address which you will copy.

You can either copy this code and paste it on Melon or click on ‘Enter Studio’ and get there quicker.
Here is how the studio looks like – I have already added the content that I would like to live stream. The next step would be adding your destination to your website.
Too add the ‘Custom RTMP’ from WpStream, you will click on the top right round icon (account). Click on ‘Settings’. Go to ‘Destinations’ and then on ‘Add Destination’.


Check out all the available destinations including YouTube, your Facebook Profile, Page, Group, LinkedIn, Twitch, and finally, Custom RTMP, which is what we will be needing.

To find your server and stream key, you will first need to go back to your WordPress admin and create a channel.

Creating a channel on WpStream
Go to ‘WpStream’ > Channels
Create a Free-To-View or Pay-Per-View channel. For this tutorial, I will just create a Free-To-View channel

You will add a Title, description, featured image, any categories, tags, and other features you need in order to customize your channel. Once you have added everything you need, you can ‘Publish’ the channel.

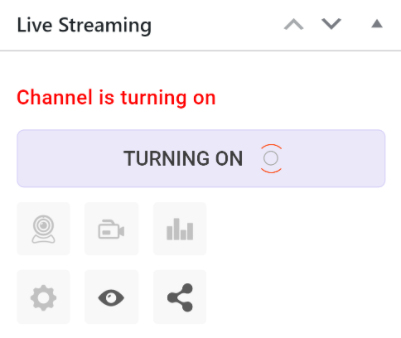
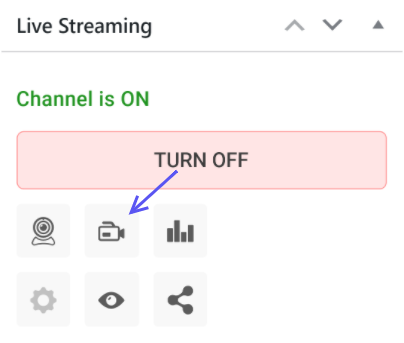
Once published, check out all the settings before you go live. A few of the settings include recording your live stream so that you can save and download/create a Video-On-Demand later, showing the viewer count on screen, locking to website, autoplay, and a few more. Enable what you need or disable what you don’t. Some of the settings are enabled by default as seen below.
I will not be recording this live stream here however, you may remember that your live stream can be saved using Melon (automatically). If you want to be extra safe, record in both. Here’s why. When you have adjusted your settings, you can ‘Start Live Event’.
Once the Live Event is ready, click on ‘Go live with External Broadcaster’ which in this case, is Melon App. You can also use any other external broadcasters or go live from the browser. In the drop down, you will see the Server and Stream Key which you will copy.
Paste the Server and Stream Key into the ‘Custom RTMP’ section on Melon App in the appropriate areas. Don’t forget to name your destination before you click ‘Add’.

Now that your ‘Custom’ destination to your website is added, click on the icon on the top right corner once again and go back to the ‘Studio’
Going Live!
Now, the fun part! It’s time to customize your live stream the way you want including the ‘Design’ with themes and logo, adding banners, tickers, and moving those around your screen. You can check out the video tutorial at the bottom of this tutorial to see exactly how you can customize it.
Once you have customized it, click on ‘Go Live’, add a ‘Title’, and a ‘Description’ as seen below. ‘Go Live’!
If you go to the page with your live stream, you will see that your live stream is running along with all the customizations. You can also change these during a live streaming.
However, it is best that you set up the main edits before going live so that it can be as organized and stress-free as possible during the live stream. Small changes can be done at any time!

Your live stream is now over. Go back to your Melon Studio and click on ‘End Stream’ and then confirm.

Your live stream would have ended and if you go back to where you were live streaming, you will see that the following message appears. Note that you can also change this message in order to let your viewers know exactly what is happening. Check out this article for instructions.
Conclusion
In this live stream, you learned how you can live stream with Melon on your website. When you use WpStream and Melon together, you get magical professionalism with a touch of versatility.
Therefore, the next time you want to live stream your own branded content, stream to multiple websites, and even schedule live streams, why not use WpStream and Melon together for the ultimate collaborative project.
Check out the video tutorial and don’t forget to like, comment, and subscribe to our channel for the latest news and tutorials!
Start your free trial with WpStream today and experience the ability to broadcast live events, set up Pay-Per-View videos, and diversify the way you do your business.
Table of Content