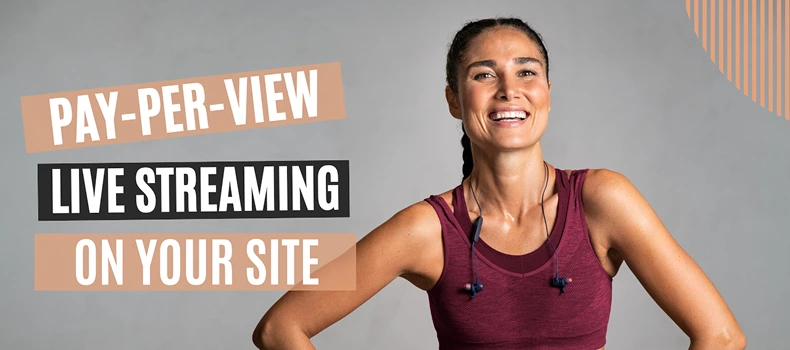
Pay-per-view (PPV) live streaming is no longer just for big boxing or wrestling matches – now any content creator (from yoga instructors to educators) can monetize live sessions on their own website. In a PPV model, viewers pay a one-time fee to access a specific live broadcast. This tutorial will show you how to create a pay-per-view live stream on a WordPress site using the WpStream plugin (for streaming) integrated with WooCommerce (for payments). WordPress + WpStream makes it easy to sell tickets to live events on your site. We’ll cover everything from installing the theme and plugins to going live with OBS Studio and even adding an optional live chat feature. Let’s get started!
Install the “Hello WpStream” Theme and Required Plugins
To set up a streaming site, begin by installing Hello WpStream, a free WordPress theme designed for the WpStream plugin. In your WordPress dashboard, go to Appearance > Themes and search for “Hello WpStream”. Install and activate the theme. This theme comes with several pre-built demo layouts (for general streaming, sports, fitness, etc.) to jump-start your design.
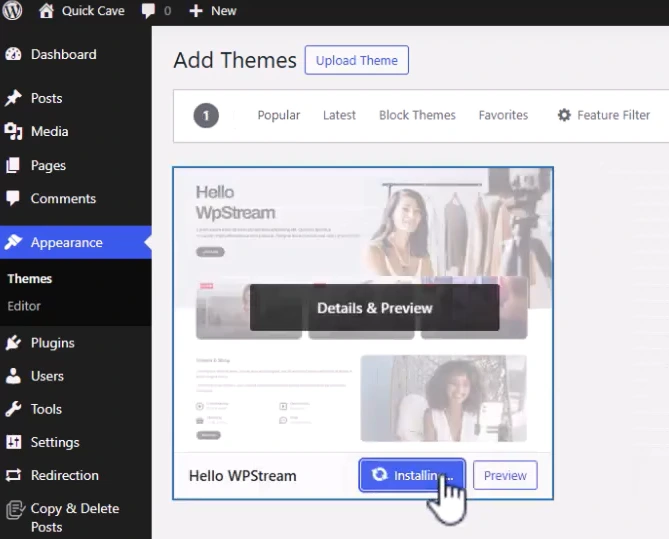
After activating the theme, you’ll be prompted to install required plugins. Make sure to install and activate the following:
- WpStream – the core live streaming plugin (enables live channels and video streaming on your site).
- WooCommerce – for handling payments and selling your live stream as a product.
- Elementor – a page builder (required for the theme’s design and demo content).
- One Click Demo Import – helps import the theme’s demo site content easily.
Optional: If you plan to include live chat, you might also install a chat plugin (the tutorial later uses Better Messages for adding a chatroom). For now, ensure WpStream, WooCommerce, Elementor, and the demo importer are active.
Import the Streaming Demo Content (Optional)
If you want your site to quickly have the same layout as the Hello WpStream theme main demo, you can import the provided demo content. This will set up pages and sections tailored for streaming.
Go to Appearance > Import Demo Data. You will see multiple demo site options that come with the Hello WpStream theme (e.g. Main Streaming, eSports, Live Shopping, Church, etc.). For this walkthrough, select the “Main Streaming” demo and click Import. Wait a couple of minutes for the demo content to import (images, pages, menus, etc.).

Once finished, your site will have a ready-made streaming layout. You can visit your homepage to see the structure. (You can skip this step if you prefer to build pages manually, but the demo gives a good starting point for a streaming website.)
Create a Pay-Per-View Live Stream Channel (WooCommerce Product)
With the plugins installed and demo in place, the next step is to create your pay-per-view live stream product (often called a “channel” in WpStream). This is essentially the event that viewers will purchase and watch.
In the WordPress admin, navigate to WpStream > All Channels and click Add New Pay-Per-View Channel to create a paid live stream.
On the Add New Channel page, fill in the details for your live stream event:
- Title – Give your live stream a descriptive title (e.g. “Yoga Class – Sunrise Session”).
- Description – Describe what the stream is about. This can include the schedule, what viewers will learn, etc.
- Trailer Video (optional) – You can upload or link a short preview trailer video. This trailer will be visible to everyone as a teaser before they purchase, so make it engaging.
- Preview Image (Thumbnail) – Set a featured image that will appear as the thumbnail for your stream (e.g. a promo image for your class or event).
Scroll down to the Product Data section. Here you need to configure this as a live stream product:
In the WooCommerce product settings, choose Product Data: Live Channel and set the price for your pay-per-view event.
- Select “Live Channel” as the product type (this option is added by the WpStream plugin).
- In the Regular Price field, enter the price you want to charge for access to the live stream (e.g. $15.00). This is the pay-per-view ticket price your viewers will pay.
- You can optionally organize the stream under product categories or tags (for example, “Yoga”, “Live Class”) to help manage multiple events on your site. This is not required but can be useful if you plan to host many streams.
- Set a Product Image (this will serve as the thumbnail on the product page, usually you can reuse the preview image here).
After filling in all details, click Publish to create the channel product. Now you have a WooCommerce product page for your live stream event.
Tip: At this point, you can click Channel Settings (a panel usually appears after publishing) to review any additional options (e.g., whether to record the stream for Video-on-Demand, enable viewer count, etc.). For most cases, the default settings are fine, but it’s good to know you have control over these features.
Start the Live Stream Broadcast (Using OBS Studio)
Now that your pay-per-view channel is set up, it’s time to go live. WpStream allows two ways to broadcast: directly via your browser (using your webcam) or using an external streaming application via RTMP. For a more robust stream with overlays or higher quality, we recommend using OBS Studio – a free, professional streaming app[4].
First, you’ll need to turn on the channel in WordPress and get the stream credentials:
- Go to WpStream > All Channels and find the channel product you created. Click the “Turn ON” button for that channel. This activates the live channel on your site (it may take a few seconds and will show the status as ON or broadcasting).
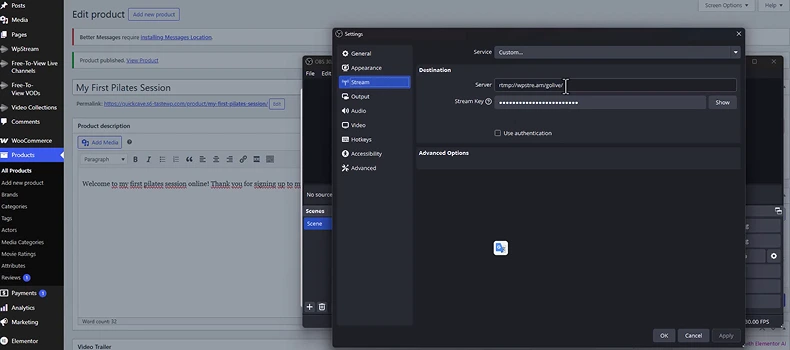
- Once the channel is on, click “Go Live with External Streaming App” (sometimes shown as an option like “Broadcast to Channel > 3rd Party”). In the dialog that appears, WpStream will provide you with a Server URL and a Stream Key (a secret key) for your channel.
WpStream provides an RTMP Server URL and Stream Key for your channel when you choose to broadcast via an external app.
Now, open OBS Studio on your computer (make sure you’ve downloaded and installed OBS if you haven’t already). We will configure OBS to stream to your WordPress channel:
In OBS Studio, go to Settings > Stream, select “Custom” service, and paste the Server and Stream Key from WpStream.
- In OBS, go to Settings, then the Stream section.
- Set Service to Custom… (since WpStream is not a preset service).
- Copy the Server URL from the WpStream dialog and paste it into the Server field in OBS.
- Copy the Stream Key from WpStream and paste it into the Stream Key field in OBS. (Keep this key secret, as it controls access to your stream.)
- Click Apply or OK to save the stream settings in OBS.
Now you’re ready to broadcast. Prepare your scene in OBS (add your webcam, microphone, or any content you want to stream). When ready, click the “Start Streaming” button in OBS. OBS will connect to the WpStream server and begin sending your live video feed.
Within a few seconds, your live stream will be active on your WordPress site. You (as the broadcaster) can click “View Channel” in the WpStream interface to see the live stream page, but note that viewers will still need to purchase access as we set it as pay-per-view.
(If you prefer browser streaming: WpStream also allows going live directly via your browser using your webcam – after turning on the channel, you would choose the “Go Live via Browser” option instead. This can be convenient for quick streams, but OBS gives you more control and quality options.)
Purchasing and Viewing the Live Stream (User Experience)
Now let’s walk through what a viewer would experience and how the pay-per-view restriction works:
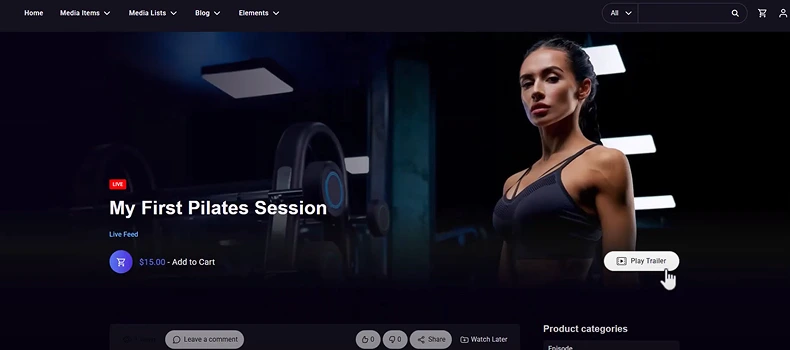
When someone visits the product page for your live stream (the channel page you created in Step 3), they will see the stream’s title, description, and the featured image or trailer video. They will not see the live video itself until they purchase access. Instead, they’ll see an “Add to Cart” button (and the price) on the page, since this is a WooCommerce product.
The live stream’s product page shows the event details, trailer video, and an Add to Cart button for viewers to purchase access.
If a visitor clicks the trailer, they can watch the preview video to get a taste of your content. When they are ready to join the live session, they click Add to Cart and proceed through the normal WooCommerce Checkout process (entering their details and payment). Once the order is completed (payment successful), that user is granted access to the live stream broadcast.
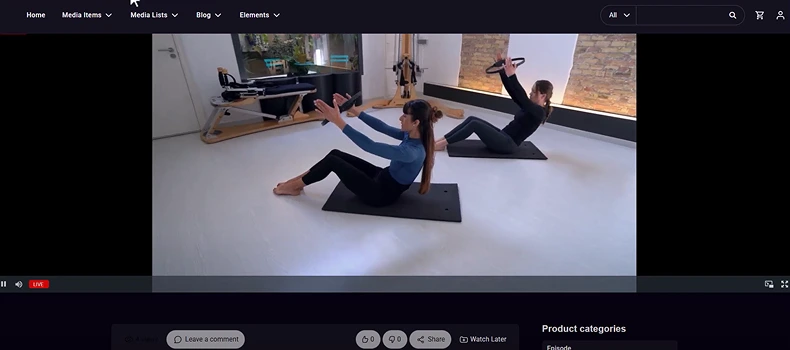
After purchasing, the viewer can return to the stream page (or they might be redirected automatically). Now, instead of an Add to Cart button, they will see the embedded live video player playing your stream (if you are currently live). If they bought in advance and you haven’t started streaming yet, the player might be blank or show a message until you go live, but once you’re live, it will play. They can also refresh the page if needed when the stream starts.
Once the viewer has purchased access, the live video stream plays on the page (with options like full-screen, and a viewer count indicator).
Access Duration: The great thing about WpStream’s pay-per-view model is that once someone purchases the channel, they have access indefinitely for that channel’s live events. This means if you plan to go live on that same channel multiple times (recurring classes, weekly shows, etc.), those who purchased it once can watch every time you broadcast on it without paying again. (If instead you want to charge for every session, you would create a new channel/product for each event, or consider a subscription model – but that’s beyond this tutorial.)
From the streamer’s side: you can also test this by purchasing the stream yourself (maybe with a test account) to ensure everything works. When the stream is live, you’ll see the video and it will show a viewer count. When you’re done broadcasting, go back to OBS and click “Stop Streaming” – the video will end for viewers (you might want to communicate a sign-off message before stopping).
(Optional) Enable Live Chat for Viewer Interaction
Live chat can greatly enhance engagement during your stream – viewers can ask questions, give feedback, or chat with each other in real time. In the video tutorial, a chat feature was added at the end. This isn’t built into WpStream by default, but you can easily add it using a plugin.
One recommended solution is the Better Messages plugin, which offers chatrooms and real-time messaging. WpStream’s team specifically suggests using Better Messages (with a WebSocket add-on for real-time updates) for integrating chat. Here’s a simplified overview of how you can set this up:
- Install and activate the Better Messages chat plugin (available free on WordPress, though the real-time features might require a paid add-on). Ensure you also have WpStream set up as above.
- In your WordPress dashboard, go to Better Messages > Chatrooms and create a new chatroom for your live stream. You can name it after your event (e.g., “Yoga Class Chat”). Adjust any chat settings as desired (permissions, appearance, etc.), then Publish the chatroom.
- After publishing the chatroom, copy the shortcode it provides (it will look something like [bp_better_messages_chatroom id=”…”]).
- Now edit the page where your live stream player appears. Depending on your setup, this could be the product page itself or a specific page showing the stream via a shortcode. If you imported the demo, your stream might be shown on its product page by default. You can use Elementor or the default editor to insert the chatroom shortcode. For example, add a Shortcode widget (in Elementor) or block (in Gutenberg) below or beside the video player and paste the chatroom shortcode there.
- Update the page.
Your live stream page now effectively works like a mini live-event platform: viewers pay to get in, watch the live video, and chat with you and others during the session.

Note: Setting up chat is optional but highly recommended if interaction is important for your stream (e.g., fitness classes where viewers might ask about form, or workshops where Q&A is expected). The Better Messages plugin is just one option – there are other live chat plugins as well. Make sure to choose one that supports real-time updates so messages appear instantly for everyone.
Conclusion
By following this tutorial, you’ve turned your WordPress site into a pay-per-view live streaming platform. You installed the streaming theme and plugins, created a live stream product with WooCommerce, broadcasted your event via OBS, and (optionally) added a live chat for engagement. This setup allows you to monetize your live content directly on your own website – your audience can purchase tickets to your stream just as they would for a physical event, and you retain control over your content and revenue.
Now you can host live yoga classes, coaching sessions, concerts, or any event and charge a fee for access, all without needing a third-party streaming service. As you grow, you might explore more features of WpStream, such as Video-on-Demand recordings, subscription plans, or multiple channels for different content.
We hope you found this guide useful. Now go live, share your passion with the world, and start earning from your content! Good luck with your first pay-per-view stream.
Check out the video tutorial!

Table of Content